我所能想到的是:
1、用户需求分析,特别需要回溯到本源
2、关联产品分析,貌似不一样的产品,实际上在满足用户需求上有同一性
3、技术分析(这玩意我不懂)
4、大胆的想象,未来的终极世界可能是什么样子?什么样子最爽?互联网在一些领域能带来超越性,所以想象力也非常重要
当然可以用产品要素组合等传统产品创新的方式来做,不过好像效果通常不太好。
最近想这玩意,脑袋大。
也许我们逐渐可以做出些中国原创领先的互联网应用来。
我所能想到的是:
1、用户需求分析,特别需要回溯到本源
2、关联产品分析,貌似不一样的产品,实际上在满足用户需求上有同一性
3、技术分析(这玩意我不懂)
4、大胆的想象,未来的终极世界可能是什么样子?什么样子最爽?互联网在一些领域能带来超越性,所以想象力也非常重要
当然可以用产品要素组合等传统产品创新的方式来做,不过好像效果通常不太好。
最近想这玩意,脑袋大。
也许我们逐渐可以做出些中国原创领先的互联网应用来。
既往的优秀互联网企业,通常面临的一个问题是,受到新进入者的新模式的挑战,从而在快速变化的互联网浪潮中被超越乃至淘汰。提前警觉并积极创新,免 于遭受此种厄运,是一种理想的境界,但是我们通常看到的是难有企业做到这点,因为企业一旦大了,就少能保持如同小的创业公司的积极的创新(谷歌的内部管理 制度除外),即使如同谷歌,也难涵盖所有的大的创新机会,因为在一个不确定的市场,一个快速变化的市场,有很多事情是闷头干出来的,之前谁也说不清楚。
那这样面临的一个基本的问题,就是如果在一个领域,已经落后,我们又如何实现超越?
大公司在这样做的时候,通常的一个问题是基于自己已有的资源去做崭新的市场,这样通常会出问题的。出问题的根本原因是在于往往这种既有的资源,限制了自己的思路,而忽略了超越的根本。
超越式创新的现状是你已经落后于别人,超越式创新的目标是在下一步或者是下两步超过别人。
超越的方式是什么呢?
跟着别人屁股走的方式肯定是不行的。但很多人通常的方式是跟屁股的方式,那最终的结果最好不过是缩短了些距离,你做得再好也不过是个跟随者。比如原 来新浪博客搞的是名人战略,你跟着去搞什么名人玩意,那你肯定玩不过别人。跟着别人屁股走的方式,还很容易带来一种极度急躁的心理,看到别人在前面又搞了 什么,自己还缺,于是乎自乱阵脚,那走在前面的就好好的笑话你了。
哪咋搞?厘清现实,洞察未来。超越式创新需要是比别人更深一步的理解产业发展趋势,理解用户的需要,为下一步乃至下下一步做好打算。在貌似跟别人走 同一步的时候,其实你已经在布局下一步及下下一步。比如搜狐博客与新浪博客的竞争,就是这样的一个典型的例子。那看到搜狐博客搞了个OW,很多想搞平台的 人着急了。其实根本不用着急的,这玩意以后走向啥,都还不明了,你如果能够很好的理解,找到下一步及下下一步,那怕啥呢?另外,很重要的是搜狐博客这玩意 并不一定是一条合适的路径,你又何苦抄它?现在还有很多抄袭facebook的后进者,也同样面临这个问题,都去抄,跟在别人屁股上,那能搞成啥样子?如 果更深一步的思考,我们知道博客不是那个博客,社区不是那个社区,你为啥不能布局下一步呢?当然,很多人不具备这个“厘清现实,洞察未来”的眼光和境界, 最后没办法只有跟屁股(跟屁股有跟屁股的方法,比如bangke.cc,也算是跟,但是是不一样的跟。与主题无关,下次再说)。
当然,这种超越式创新的路径,出了眼光,还非常需要领军人物有忍耐力,要能耐得住寂寞,在一片不利的声音中,去坚持,去抗住各种压力,去潜心的做布局未来的事情。耐得寂寞,方成大事嘛!
“熵增原理” 告诉我们,在孤立系统中,实际发生的过程,总使整个系统的熵值增大,从而带来这个系统的死亡。做为企业这个系统,虽然不是一个封闭的孤立的系统,但是如果 内部未有更新的机制,外部不加以刺激物的引入,与外界实现良好的交互,也会带来这个系统的“熵”增加,从而带来企业这个系统不可避免的走向衰落。创新,是 减少企业“熵”值增加的手段,从控制力与创新力的角度来看,我们可以将其分为内部创新、内部创业、外部创业、协作生态系统几种方式。

1、内部创新
内部创新在各个IT和互联网公司都或多或少的存在。但是由于传统的内部创新手法,通常带来的只是连续性创新和动态连续性创新,以及部分的非连续性创新,对于对企业造成极大威胁的一些非连续性创新通常难以在内部产生。特别是对于中国很多采用抄袭和跟随战略的IT互联网企业,通过内部诞生非连续性创新的可能性更小。
通常的内部创新带来的系统的“熵”减少有限,而IT互联网的快速变化带来这个行业中的企业的“熵”增加速度远高于其他处在传统行业中的企业,以至于华为会采用一些极端的方式,去大力减少随时间流失,企业这个系统增加的“熵”:1996年,以华为董事长孙亚芳为首的华为市场部中高层“先辞职,再重新竞业”,市场部干部全面“洗盘”,不少干部重新回到普通员工岗位;2003年所有公司中高层集体“申请降薪”。2002年前后,电信业冬天使华为业绩面临创业来首次下滑,在任正非带头下,超过300多名干部主动申请降薪10%,以共渡难关;2008年,华为公司包括任正非在内的所有工作满八年的华为员工,在2008年元旦之前,都要先后办理主动辞职手续(即先“主动辞职”,再“竞业上岗”),再与公司签订1-3年的劳动合同;废除现行的工号制度,所有工号重新排序。
2、内部创业
Google的成功,是技术的成功,也是商业模式的成功,更是内部创新机制的成功。“与以往你所见到的任何技术公司有所不同,它像孵化器一样收集、生产来自各处的想法。它给予那些有好想法的员工足够的时间、经费及人力支持,让创新自下而上产生。当一款产品取得巨大成功,创新团队甚至有望获得千万美元级别的创始人奖金——这样的奖金一年会发3、4次,因此,也有人将Google称为“硅谷最奢侈的风险投资公司”。”自2003年以来,Google一直在内部实行“70-20-10原则”:将70%的力量投入核心业务,20%的力量投入相关业务,10%的力量放在探索业务。即使Google尊重每一个新想法,它仍必须度过三重考验。通过这种内部模拟风险投资公司的模式,谷歌在互联网行业创造了一种崭新的企业管理模式,我们可以称之为“内部创业”。
采用“内部创业”的创新模式的企业,在谷歌之前有思科。思科采用内部创业模式的原因在于:早期的创业员工富有了以后很多会选择离开公司去创业或者干脆退休;由于在内部的收益较低,有些员工一旦有了好的想法,宁可自己出来创业,也不愿贡献给自己的公司。思科具体的做法是,如果公司里有人愿意自己创业,公司又觉得他们做的东西是好东西,就让他们留在公司内部创业而不要到外面去折腾,而思科会作为投资者而不再是管理者来对待这些创业的人。一旦这些小公司成功了,思科有优先权把它们买回来,思科的地盘就得到扩大。而这些独立的小公司的创办者和员工,又可以得到很高的回报。
陈天桥在2008年年初的一次管理层扩大会议上,鼓励员工进行内部创业:“如果你想创业,如果你想发展,请你大胆地提出来!”根据盛大的计划,内部员工创业可以获得盛大的全额投资,唐骏透露:“第一轮的投资控制在800万元以内,我们投入的计划会在6到9月之间,到期将再对项目进行评估,以确定是否需要继续投入,盛大的投资期可以长达三年,分几次进入。”陈天桥的做法,应该有对被史玉柱拉走一个团队,进而长大成自己的一个巨大竞争对手的反思有关,也是对目前的行业的深入思考后的一个大胆决策。能够花那么多钱去购买外面的公司,为啥不能让自己内部的员工在内部创业呢?
其实就淘宝、支付宝、阿里软件这些阿里集团的内部企业,稍稍熟悉一点他们的成长史的人就知道,也可以将其理解为一种内部创业,不过这种内部创业不是自下而上的,而是自上而下的。
3、外部创业
外部创业一定程度上是一种无奈之举,比如华为之李一男。这种外部创业通常的问题 是,企业对于员工外部创业的掌控力下降,这种外部创业有可能是收益,但更可能带来的是伤害。口碑网的李治国离开阿里巴巴,在外创业,后来又回归阿里巴巴, 这是一个难得的案例。马云也说过,以后不会买这种内部员工出去创业的公司。马云的这种考虑,自有从企业管理角度的考虑,这样做很可能乱规矩。
对于一个企业来说,如果不能实现很好的内部创新,我倒觉得,一定程度的外部创新倒 是可取的方式。这种外部创业能够带来很大的创新力,在收购的整合问题上,通常遇到的文化障碍也比较少。不过在中国,很多从大公司出去创业的人,通常同原来 的老板闹得有点不欢而散的感觉,而原有老板的气度也让这种“外部创业”的模式不好搞。搜狐原来收购过很多企业,搜狐也有众多的人出去在外创业,不知何时能 够诞生一个外部创新的案例。也许搜狐同优酷的合作,是个开端。而百度与爱帮,我们能在外来将其看作一个“外部创业”的例子吗?
4、协作生态系统
互联网行业正在发生一个大的转变,从单打独斗的封闭系统转向协同生态创新体系的建设。互联网企业通过协作生态系统的建设,大力与外部环境和外部协作伙伴交互,将有效的降低企业的“熵”,而企业本身的边界,从内部的创新、内部模拟创业、外部创业这种方式中的企业内部人,有效的延伸到整个关联的协作伙伴,带来的创新的价值将远超之前的三种模式。比如搜狐博客推出OW之后,其widget从12月12日的21个模块,快速的增长到1月7日的215个模块。
但是,这种开放性带来的创新力的快速增长的同时,也带来系统建设的难度,如何搞,是一个巨大的挑战。在稍后的一些时候,我会撰文,谈谈协作生态系统如何搞的的问题。重要说明:本文包含有关如何修改注册表的信息。在修改注册表之前,一定要先对其进行备份,并且一定要知道在出现问题时如何还原注册表。有关如何备份、还原和修改注册表的更多信息,请单击下面的文章编号,以查看 Microsoft 知识库中相应的文章:
| 1. | 单击“开始”,单击“运行”,键入 regedit,然后单击“确定”。 | ||||||
| 2. | 找到并单击下面的注册表子项: HKEY_LOCAL_MACHINE\SYSTEM\CURRENTCONTROLSET\SERVICES\VDS\ALIGNMENT | ||||||
| 3. | 在“编辑”菜单上,指向“新建”,然后单击“DWORD 值”。 | ||||||
| 4. | 键入 LessThan4GB 作为新项的名称。 | ||||||
| 5. | 右键单击“LessThan4GB”,然后单击“修改”。 | ||||||
| 6. | 在“编辑 DWORD 值”对话框中,单击“十进制”。 | ||||||
| 7. | 在“数值数据”框中,键入 0,然后单击“确定”。 | ||||||
| 8. | 重复步骤 3 到步骤 7,以添加下列注册表项:
| ||||||
| 9. | 退出注册表编辑器。 |
| 文件名 | 文件版本 | 文件大小 | 日期 | 时间 | 平台 |
|---|---|---|---|---|---|
| Ntoskrnl.exe | 5.1.2600.3086 | 2,182,144 | 2007-2-19 | 10:44 | x86 |
| • | Microsoft Windows XP Professional Edition |
| • | Microsoft Windows XP Home Edition |
| • | Microsoft Windows XP Media Center Edition |
The question I am asked most often is "How do I install a dual-boot with Windows XP on my new Windows Vista computer?" The answer is that it's not that difficult, it's just very time consuming, and you need to own a copy of Windows XP.
Note that you should not attempt this if you aren't ready to troubleshoot any problems that might occur.
The first issue we encounter is that computers with pre-installed operating systems take up the entire drive. Luckily Microsoft included the Shrink volume feature in Vista, so we can easily shrink the Vista partition down to make room for XP.
Open the Computer Management panel, which you can find under Administrative tools or by right-clicking the Computer item in the start menu and choosing Manage. Find the Disk Management item in the list and select that.

Now we'll shrink our volume down by right-clicking on the main hard drive and choosing Shrink Volume.

Now you can choose the size that you want to shrink, which really means you are choosing the size that you want your XP partition to be. Whatever you do, don't just use the default. I chose roughly 10gb by entering 10000 into the amount.

The next step might be confusing, because we need to change the cd-rom drive that's invariably taking up D: at the moment, because we want to use D: for the Windows XP partition, but it's already taken by the cd-rom drive. If you skip this step than XP will install onto the E: drive, which isn't the end of the world, but it's not quite as tidy.
Right-click on the cd-rom drive in the list and choose Change Drive Letter and Paths from the menu.

Now we'll change the CD drive to use E: by selecting that in the drop-down.

Now we can create a new partition for XP to live on and make sure that the drive letter is set the way we want. If you do not create a partition now the XP install will do so automatically, but it's easier and cleaner to do it this way.
Right-click on the Unallocated free space area and then select New Simple Volume from the menu.

Follow through the wizard and select whatever options you'd like, making sure to use D: as the drive letter.
Now you will need to close out of disk management and reboot your computer. This is because we can't do the next step until we reboot. (you can try, but it won't work)
So we've come back from rebooting… open up Computer from the start menu and then right-click on the D: drive and select properties. Give your partition a meaningful name like "XP". It would be wise to name the C: drive to "Vista" at this point as well.

Now you'll want to pop your XP cd into the drive and boot off it. You may have to configure your BIOS to enable booting off the CD drive, or if your computer says something like "Hit Esc for boot menu" you might want to use that.
Once you come to the screen where you can choose the partition to install on, then choose either the unpartitioned space or the new partition you created. Whatever you do, don't try and install onto your Vista partition! See how much cleaner it is now that we've labeled each partition distinctly?

We'll assume XP is completely installed at this point, and you will have lost your ability to boot into Windows Vista, so we'll need to use the VistaBootPro utility to restore the Vista boot loader.
Download and install VistaBootPro from vistabootpro.org
During the install you'll be forced to install the .NET 2.0 framework. Open up VistaBootPRO and then click on the System Bootloader tab. Check the "Windows Vista Bootloader" and then "All Drives" radio buttons, and then click on the Install Bootloader button.

At this point, the Windows Vista bootloader is installed and you'll only be able to boot into Vista, but we'll fix that. Instead of manually doing the work, we'll just click the Diagnostics menu item and then choose Run Diagnostics from the menu.

This will scan your computer and then automatically fill in the XP version.. click on the "Manage OS Entries" tab and then click in the textbox for Rename OS Entry, and name it something useful like "Windows XP" or "The Windows That Works"
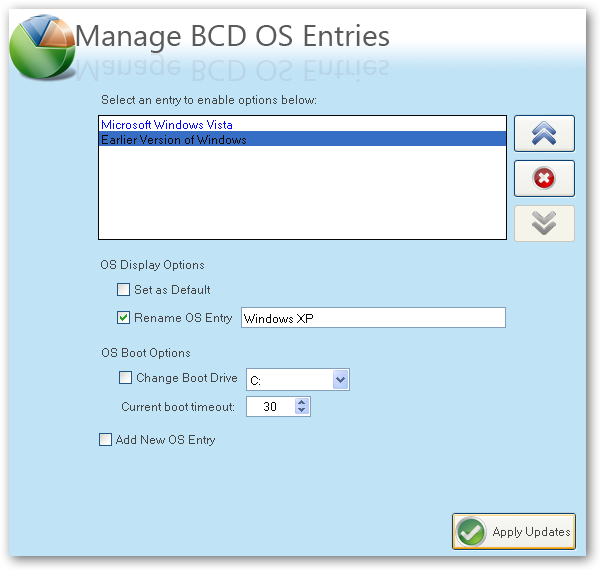
Click the Apply Updates button and then reboot your computer… you should see your shiny new boot manager with both operating systems in the list!

If you get an error saying "unable to find ntldr" when trying to boot XP, you'll need to do the following:
There's more information on this forum thread, thanks to nrv1013
This is a critical piece of information: Windows XP will be installed on the D: drive, even in Windows XP… so you'll need to keep that in mind when tweaking your system.

You can share information between the drives, but I wouldn't recommend messing with the other operating system's partition too much… it might get angry and bite you. Or screw up your files. What I do recommend is that you store most of your files on a third drive shared between the operating systems… you could call that partition "Data".
I'm going to write a number of followup articles dealing with all of the issues with dual-boot systems, so subscribe to the feed for updates.
If you have issues with your dual-boot system, I'd recommend creating a new topic in our Vista forum, and we'll try and help you.
If you have issues with using the shrink volume feature, check this article for some tips.
Remove Vista, installed next to another Windows operating system (e.g. 98/XP)
Don't forget to make a backup as there are some risks with removing Vista!
This is what you need:
- Windows Vista installation DVD
This is what you should do:
1. Start your computer selecting Windows XP from the boot menu
2. Insert the Windows Vista installation DVD into your drive and close the menu that might open
3. Go to START > RUN > and type: "e:\boot\bootsect.exe /nt52 ALL /force” (without quotes, and replace e: with the drive letter of your Vista DVD).
4. Restart your computer and boot into Windows XP
5. Format the drive where Windows Vista was installed on
6. Remove two files (Boot.BAK & Bootsect.BAK) on your XP root folder (e.g. C:\)
This should remove your Windows Vista installation and make XP the default operating system.
| | ||||
| FEATURE | HOME BASIC | HOME PREMIUM | BUSINESS | ULTIMATE |
| Most secure Windows ever with Windows Defender and Windows Firewall | YES | YES | YES | YES |
| Quickly find what you need with Instant Search and Windows Internet Explorer 7 | YES | YES | YES | YES |
| Elegant Windows Aero desktop experience with glass-like menu bars, Windows Flip 3D, and Live Thumbnails | YES | YES | YES | |
| Best choice for laptops with Windows Mobility Center and Tablet PC support | YES | YES | YES | |
| Collaborate and share documents with Windows Meeting Space | YES | YES | YES | |
| Experience photos and entertainment in your living room with Windows Media Center | YES | YES | ||
| Enjoy Windows Media Center throughout your home with Media Center Extenders | YES | YES | ||
| Protect against hardware failure with Windows Complete PC Backup and Restore | YES | YES | ||
| Use Scheduled Backup to automatically backup your files | YES | YES | YES | |
| Easier business networking connectivity with Networking Center and Remote Desktop | YES | YES | ||
| Better protect your data against loss with Windows BitLocker Drive Encryption | YES | |||
| Easily make DVDs with Windows DVD Maker | YES | YES | ||
| Have more fun on your PC with three new premium games: Chess Titans, Mahjong Titans, and Inkball | YES | YES | YES | |
| Create high definition movies with Windows Movie Maker in High Definition | YES | YES | ||
All versions of Vista are available in our astore's at:
You must use a full retail or OEM version of XP (not the cd from your old computer) this makes life really easy and can usually be downloaded from the web.
You must also have a genuine XP key, which has not been used on another system (without genuine key you will not get updates and your system will be labeled as using pirated software by Microsoft.
Next you should know or find out the specifications of your system, to do this goto Manufactures website.
The most important step is to find out if your hardisk is using SATA interface (if so you will require the SATA XP drivers and a floppy disk, as this is the only way that XP can install these drivers.)
Install XP via cd rom by booting cdrom at system start (if you cannot do this then you must access your system bios at first boot by pressing F2 or Del keys(or whatever key your system uses) and change the boot option to cdrom as first drive.
If your system uses SATA press F6 when XP prompts "press F6 to install other" at very beginng of XP install and install sata drivers from floppy.
Use our guides to install XP
http://www.windowsxpprofessional.windowsre...REPAIR%20GUIDES
After install you will have to install your systems other drivers(ie. chipset graphics audio etc) found by reading your system specifications and downloading from your Manufactures website)
AN XP INSTALL IS NOT FOR THE FAINT HEARTED AND WILL REQUIRE A THOROUGH UNDERSTANDING OF YOUR SYSTEM SPECIFICATIONS A FULL RETAIL OR OEM XP DISK AND CORRECT XP DRIVERS.
如今,越来越多的PC在出厂时预装Windows Vista, 这在很大程度上给用户带来了方便——虽然预装的Windows Vista多为Home Basic之类简化版本——不过,对许多用户而言,也许更习惯于Windows XP,加上日常使用的某些应用软件可能在Windows Vista中运行不太正常,因此,很多人希望在能系统中安装Windows XP,当然,前提是不影响系统中预装的Windows Vista,毕竟那是花钱买的。
许多用户想知道怎样在预装Windows Vista的PC上安装Windows XP,并设置双重启动分别进入不同的系统,鉴于我们精力有限,不能一一回复。因此,在此作一简单总结,介绍在预装Vista的PC上安装Windows XP的基本思路,希望能对朋友们有所助益。
警告:不要在预装Windows Vista的PC直接安装Windows XP众所周知,微软在Windows Vista中采用了全新的系统启动管理机制、全新的BootLoader,迥异于自Windows NT以来包括Windows 2000 /XP /2003中使用的ntldr,因此,直接在预装Windows Vista的PC安装Windows XP将破坏Windows Vista的Boot Loader,正如我们在Windows Vista安装教程中所言的那样:
如果您希望在PC中同时使用多个操作系统, 必须保证Windows Vista是最后安装的系统,不然,比如说如果在安装Windows Vista后再安装Windows XP,将会造成Windows Vista的boot loader被ntldr+boot.ini覆盖,导致Windows Vista无法启动。
这一点希望谨记。
如何在预装Vista的PC上安装Windows XP下面介绍在预装Vista的PC上安装Windows XP的设置步骤:
如果您的PC硬盘在出厂时已分割了多个分区,可直接跳到“安装Windows XP”;
为Windows XP准备单独的安装分区
很多PC的出厂设置中,硬盘未进行分区,即系统中仅包含“c:”盘,尤其在大部分笔记本电脑上极其普遍。在这种情况下,需要首先分割硬盘,为Windows XP准备一个单独的分区。
打开磁盘管理器,在“C:”盘上单击右键,选择弹出菜单中的“压缩卷”,缩小Windows Vista所占用的分区,为新建分区调整出空间。注意:需为Windows Vista分区保留足够的可用空间;
在调整出的“未分配的磁盘空间”上单击右键,选择“新建卷”,创建用于安装Windows XP的新分区;
推荐:最好重新调整系统盘符,对原来只有一个分区的系统而言,往往采用硬盘为“c:”盘,而DVD 为“d:”盘的设置,这样,新建的硬盘分区盘符则依顺序被排为“e:”盘,在某些情况下可能会存在某种隐患。因此,建议在此时应重新调整盘符,比如将硬盘 分区设为“c:”“d:”,而将DVD盘符调整为“e:”。虽然这一步不是必须要做的。
要调整系统盘符设置,在磁盘管理器中选中相应分区,右键单 击选择“更改驱动器号和路径”即可。当然,对于上述情况,即DVD已占用盘符“d:”的情况,可首先将DVD调整到一个未使用的盘符,如“z:”,然后, 在将新建的硬盘分区盘符设置为“d:”,释放出占用的“e:”盘符后再调整回来。
关闭磁盘管理器,重新启动Windows Vista。注意,要让Windows Vista接受修改后的硬盘设置,系统可能需重启两次。
在Windows XP中下载、安装VistaBootPRO,注:Windows XP需能够支持.Net Framework 2.00;
运行VistaBootPRO,在Bootloader标签页中点击“Reinstall the Vista bootloader”,以重建Windows Vista的BootLoader,让系统能够启动进入Windows Vista。注意,仅完成这一步只能让系统启动进入Windows Vista,而无法启动Windows XP,接下来还要设置双重启动。

点击“Diagnostics”菜单项中的“Run Diagnostics”,让VistaBootPRO找到系统中存在的除Windows Vista之外的其他OS,待分析完成后即可看到除“Microsoft Windows Vista”外,还有名为“Earlier versions of Windows”的一项,此即是我们新安装的Windows XP,点击“Apply”即完成对Windows Vista与XP双重启动的设置。——当然,如果您愿意,也可以在此界面设置默认启动的系统、菜单延时等具体细节。

如此,即完成在预装Windows Vista的PC上安装Windows XP及设置双重启动分别引导进入两个系统的操作了,您可以在享受系统预装的Windows Vista的同时,继续使用更习惯、操作更熟练的Windows XP。
这个问题,主要需要解决,C盘已经有Windows Vista系统,想把 Windows XP 或者 Windows 2003 安装在其他分区,例如D盘E盘F盘G盘H盘等等上面。。。
别着急,这个问题手到擒来,接招:
第一步、本步的目的,是在于先在Windows Vista系统下面做好多启动菜单,为安装新的xp或者2003系统做好准备。在Windows Vista 系统下面先下载运行Vista优化大师(点击此处下载),打开Vista优化大师,采用如下步骤:
1、点击左侧的“系统设置”
2、点击下面的“系统启动设置”
3、点击右侧的“多系统选择”
4、点击底下的“添加”,详细见下图——

5、点击添加后,会出来一个对话框,选择系统类型为其它即可,系统名称那儿输入你想要在开机启动菜单里面显示的文字,例如:“Windows XP”或者“Windows Server 2003”,如下图所示:

6、我把上一步的系统名称设为“Windows Server 2003”(你随意设置成Windows 2010都行,只要你自己明白,呵呵),点击确定,你刚才添加的新系统就出现在Vista优化大师的窗口里面了,下次开机时候,这个会出现在你的电脑开机启动菜单里面,当然,我们这还只是第一步先做好启动准备,你还没安装新的操作系统呢。 Vista优化大师下面还有备份和还原按钮,是用来对你的电脑启动菜单设置做备份的。你可以选中系统列表中的各个系统,点击“设为默认启动项”,这样可以 作为电脑开机后的默认启动系统,当然,是在你没进行系统选择的情况下,等待30秒后的默认。对了,那个操作系统选择等待时间,你也可以在Vista优化大 师里面进行更改,一般默认为30秒。

到此,第一步就胜利完成,实际上,是非常简单的。
第二步,拿出 Windows XP 或者 Windows 2003 的光盘,启动电脑,用光盘安装。你在第一步里面选择的是D盘,你就安装在D盘行了。总之,和你第一步里面选择的新系统位置的盘符一样就成。
在D盘(在此以D盘为例)装好Windows XP 或者 Windows 2003之后,你尽情的安装更新和驱动程序行了。你还可以把虚拟内存和Windows Vista 设置在同一个分区。
那么,下面进入关键的步骤了!睁大眼睛看:
1、在你的Windows XP或者2003系统里面,更改文件夹选项,让系统显示隐藏文件和隐藏的系统文件,把你C盘的 ntldr 这个文件,拷贝到你的Windows XP 或者 Windows 2003所在的盘符根目录,这篇文章里面,我们用D盘做的例子,你就把 ntldr 这个文件拷贝(就是复制)到 D 盘的根目录行了。
2、插入 Windows Vista 的光盘,然后,打开“运行” (开始〉运行),输入cmd.exe 并运行,进入命令行程序。
3、输入 X: (X代表你的光驱盘符)。
4、输入 cd boot
5、输入 bootsect /nt60 SYS
彻底完成。OK,下面,取出你的启动光盘,用你的硬盘直接启动吧,看看,多系统启动菜单是不是出现了?随便选择 Windows Vista 或者你的 Windows XP/2003,都可以正常的启动了。
注;本文转自Vista之家